|
FAQs | Feedback |
The Task Model is the primary “Data Model” that is used to create Planned Tasks. A planned task is a task instance that is scheduled and assigned to a company to perform. A planned task will adopt the configuration from the task model, so if the task model was configured to be performed on a recurrence (e.g. preservation task) then when the planned task is created, it will also honor the same recurrence. The user would schedule the planned tasks, but it would still have the same recurrence and all other settings as defined in the task model (parent object). A recurrence is usually applied to preservation tasks, routine inspections, maintenance tasks.
Since Task Models are template records that define scope for a task, it is considered a critical object and therefore includes version control. A task model has approval workflow where once approved is locked from editing. In order to edit an approved Task Model it must be first revoked and revocation comments entered. This will then allow a user to change information and resubmit for approval.
The task model edit form will exposes several tabs where a user can allocate resource tiles and MHrs, tools, materials, test form(s), enter in specific inspection points and even fill out a safety audit and work permits if needed. This information is very useful for workforce planning and estimating, but most importantly is used to simplify and streamline work creation and assignments.
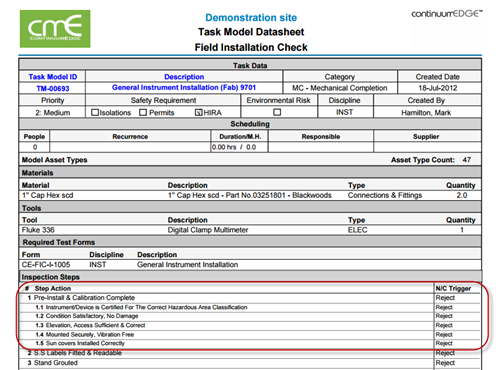
Task models are critical records that are tracked for version control, so when a record is created please enter a revision number. Once approved an instance of the Task Model is archived (Task Model Datasheet) so it can be referenced at a later date for a comparison.

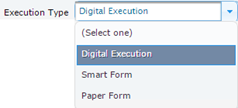
A Task Model should be assigned one of the following Execution Types:
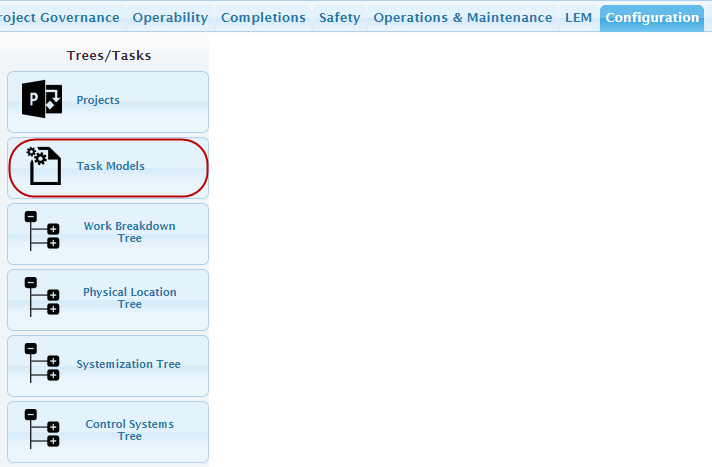
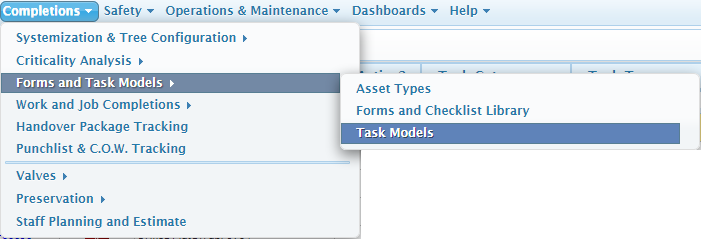
The process for accessing the Task Models Manager is outlined below:
Step |
Action |
1 |
Navigation (2 methods):
Task Model Manager. |
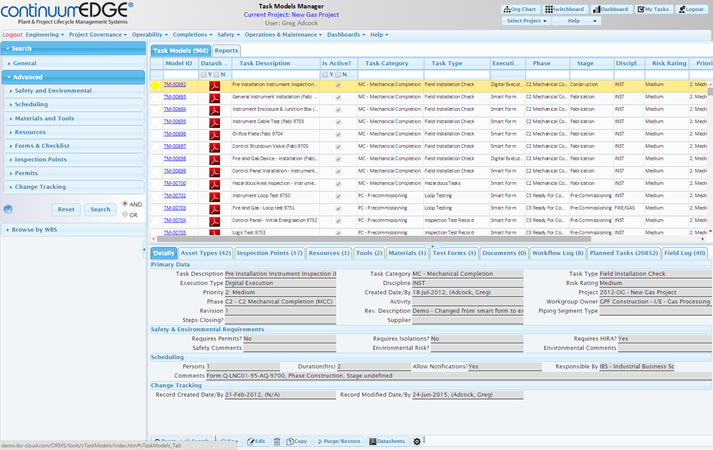
2 |
Task Model Manager. Creating task models can be done using the Import Utility or can be created manually by pressing the NEW or COPY buttons. NOTE: Before task models are created the following reference lists must be created:
Task Model Edit Form. |
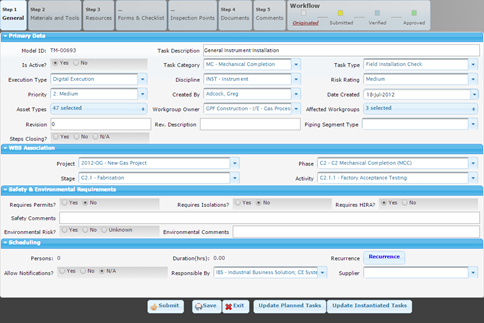
3 |
Enter in Task Model Information: It is important when a record is created that as much information is entered as possible. At a minimum the following should be entered or assigned:
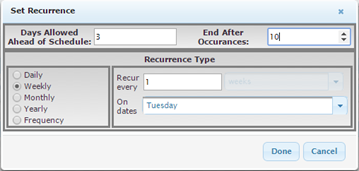
Setting Recurrences. |
4 |
Setting Recurrences: If a task model is meant to be performed on a recurring basis, select the Recurrence button and select the most appropriate Recurrence strategy. The Recurrence function is the same functionality as what is found in Microsoft Office calendar options. The “Days Allowed Ahead of Schedule” is the option where a task can be performed “x” days ahead of the next scheduled date. If a task was meant to be performed monthly on the 7th of every month, and the days allowed was 3, then the person performing the task could only perform the next scheduled task no earlier than the 4th of each month. The “End After Occurrences” is the option where a task is scheduled to be performed “y” times. If a task is meant to be performed monthly, such as a preservation task during Spring in a tropical area. The user would have the option to configure the task model to be performed no more than 4 times as it would then likely be a different client requiring a different preservation frequency or strategy. This is optional.
Assigning Materials & Tools, Resources, and Forms & Checklist. |
5 |
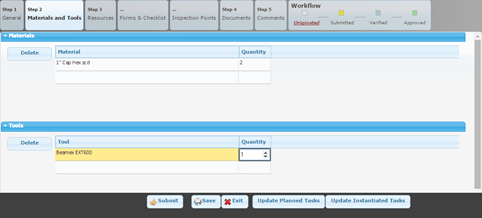
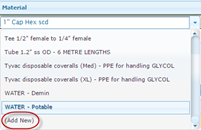
Assigning Materials & Tools, Resources, and Forms & Checklist: Assigning Tools, Materials and Resources all use the “Editable Grid” control which allows a user to select an item (e.g. Material Item) and enter in a quantity required. If the tool or material is not in the list, and a user has General Configuration rights, then they will have the ability to “Add New” item. The “Add New” function is at the bottom of the dropdown, otherwise select the item and enter in a quantity.
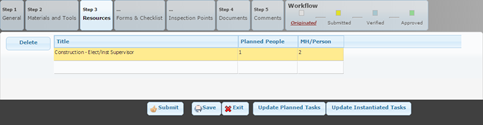
NOTE: The two (2) most important items to fill out for a task model is the “Test Form” and “Resource Titles” required performing the task. The Test Forms are the deliverables for the task if performed with Execution Type = Paper Execution. The Resource Title allocation and Man-Hours is used to generate a baseline in Resource Man-Hours, by discipline, title, timeline (by week) and systemization. Without baseline estimate of resource requirements there will be no Man-Hour estimating in the CCMS.
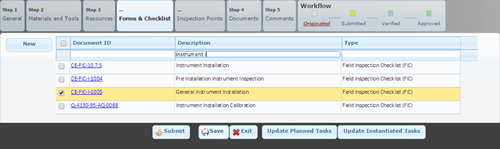
Select Test Forms. |
6 |
Select the Test Form(s): Typically it is one form per Task Model, but in the case multiple forms are required select the checkbox next to each form required as a deliverable to complete the task.
Inspection Points. |
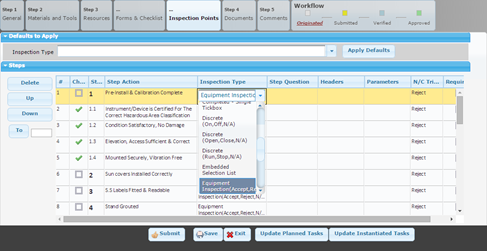
7 |
Entering in Inspection Steps, Assigning Inspection Types and Non-Compliance Triggers: The inspection Points tab will only display if the execution type is set to either “Digital Execution” or “Smart Forms”. To configure the inspection steps, the user would typically take the paper based form inspection steps and cut and paste them into the inspection steps. One step per question as found in the form. Inspection steps can have “Step Actions”. A step action is just a child object of the step, and is used to nest the inspection steps so that it the questions or entry points are more organized to look like a regular form. To make a line item a Step Action select the checkbox in the “Child” column, and it will make the row a child object of the row above it. When assigning an “Inspection Type” select the dropdown and it will automatically configure the NC trigger options. For example, if a user selects “Yes, No, N/A” inspection type, the NC trigger options will be the same list. Typically, the “No” answer would be used to trigger a Punchlist for CCMS Planned Tasks, or a Non-Compliance for CCMS preservation tasks. NOTE: If an Inspection Type is not assigned to a row, the CCMS mobile application and cloud interface will treat that step as a Label. Typically, if a task has a grouping of questions, a user would configure a task model so that the step would be say “Nameplate Information” with no inspection type. This would show up as a label in the web interface, and a label on the task datasheet. Then you would create a Step Action under the step asking “Is the Nameplate Information Correct?” and you would assign an inspection type of “Accept, Reject, N/A” with a NC Trigger of Reject.
Next Training: Task Model Approval & Planned Task Updating |
For internal use only
|